In this simple tutorial you are going to learn how to use the Entity Framework Code First approach, through an example, to build a website in ASP.NET MVC and create a database for the management of a Robot Dogs production.
Let’s begin.
1. Create the application
Open your Visual Studio and create a new MVC project.

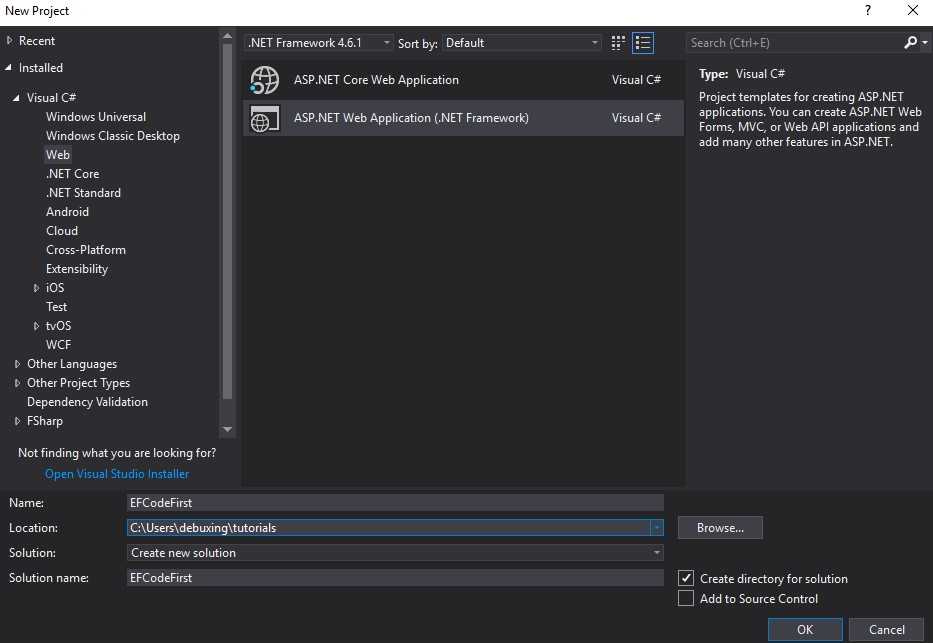
In the next step, make sure that No Authentication is selected. We want to keep this project simple.


2. Install Entity-Framework
The next step is to add Entity Framework to the project.
You have two ways.
-
- Tools Menu -> NuGet Package Manager -> Package Manager Console
In the console, write the command : Install-Package EntityFramework - Right click on the project and then Manage NuGet Packages..
Browse and install the EntityFramework package.
- Tools Menu -> NuGet Package Manager -> Package Manager Console


At this time it will be installed the version 6.1.3
3. Create the model
We will model the production of robot dogs.
So, we need a model for the dogs, a model for the factory and a model for the production of these wild beasts.
Create the classes in the Models folder.
RobotDog model
{
public int ID { get; set; }
public string Name { get; set; }
public bool Armed { get; set; }
public virtual RobotProduction RobotProduction { get; set; }
}
ID is the primary key of the RobotDog table in the database that will be created. We could also have named it RobotDogID(following the classnameID convention).
RobotProduction is a navigation property, it holds the related RobotProduction in a one-to-one relationship. (RobotProduction contains the RobotDog id as a foreign key)
RobotFactory
{
public int ID { get; set; }
public string Name { get; set; }
public string Location { get; set; }
public virtual ICollection RobotProductions { get; set; }
}
In this case a robot factory can have many productions. ICollection is a navigation property for a one-to-many relationship.
RobotProduction
{
public int ID { get; set; }
public int RobotDogId { get; set; }
public int RobotFactoryId { get; set; }
public DateTime ProductionDate { get; set; }
public virtual RobotDog RobotDog { get; set; }
public virtual RobotFactory RobotFactory { get; set; }
}
RobotProduction has simply a one-to-one relationship with RobotDog and RobotFactory, RobotDogId and RobotFactoryId are two foreign keys.
4. Create the Data Context
DbContext is the main class of Entity Framework responsible of the coordination of the functionalities.
It let us interact with data as objects.
{
public class RobotContext : DbContext
{
public RobotContext() : base("RobotContext")
{
}
public DbSet RobotDogs { get; set; }
public DbSet RobotFactorys { get; set; }
public DbSet RobotProductions { get; set; }
protected override void OnModelCreating(DbModelBuilder modelBuilder)
{
modelBuilder.Conventions.Remove();
}
}
}
DbSet: An entity set, which corresponds to a database table, used to perform CRUD operations.
Notice how we create a DbSet for each entity that we modeled.
base(“RobotContext”): It simply specifies the name of the table to be created.
Default would have been {Namespace}.{Context class name}, EFCodeFirst.Models.RobotContext.
Not so attractive, isn’t it?
Removing PluralizingTableNameConvention means that the tables that will be created singularized.
RobotDog, not RobotDogs.
But if you prefer, you can instead go with the pluralized convention.
5. Data annotation
We are not going into details with data annotations in this guide, but this could be a good time to add your data annotations in your model classes.
There will be a tutorial about that.
6. Create Controller and views
Now it’s time to create a controller and some views for the managing of the robot dogs.
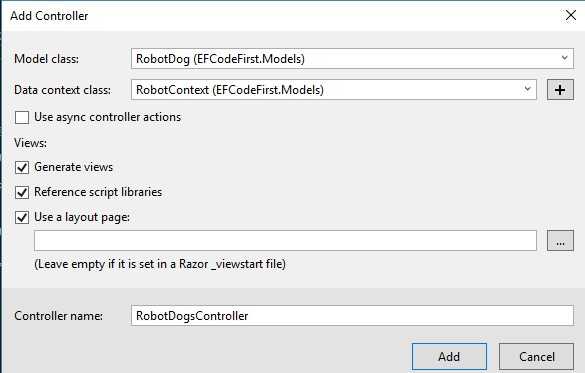
- Create a new Scaffolded Item.
- Select MVC 5 Controller with views, using Entity Framework
- Fill the form and click Add.
- You may receive an error if you did not recompile your project


And the scaffolder does all the work for you. Give a look at all the methods and views created.
7. Populate the Database
For the purpouse of testing, we can automatically insert some data in the database after its creation.
You can choose to drop-create the db:
- Only if it doesn’t exist
- Everytime the model changes (not so good in production.. You’d lose all your ferocious robots)
We’ll go with the second, making our initializer class inherit from DropCreateDatabaseIfModelChanges.
Add a new class called RobotInitializer, in which you will create collections of elements to be inserted in your context class, adding them in the database.
{
protected override void Seed(RobotContext robotContext)
{
var robotDogs = new List
{
new RobotDog { Name = "Marbot", Armed = true },
new RobotDog { Name = "Zip", Armed = false },
new RobotDog { Name = "Flash", Armed = false },
};
robotDogs.ForEach(x => robotContext.RobotDogs.Add(x));
robotContext.SaveChanges();
var robotFactories = new List
{
new RobotFactory{ ID = 3400, Location = "Dallas", Name = "Robotmart" },
new RobotFactory{ ID = 7000, Location = "New York", Name = "Targot" }
};
robotFactories.ForEach(x => robotContext.RobotFactorys.Add(x));
robotContext.SaveChanges();
var robotProductions = new List
{
new RobotProduction { RobotDogId = 1, RobotFactoryId = 3400, ProductionDate = DateTime.Today },
new RobotProduction { RobotDogId = 1, RobotFactoryId = 3400, ProductionDate = DateTime.Today.AddDays(-1) },
new RobotProduction { RobotDogId = 2, RobotFactoryId = 7000, ProductionDate = DateTime.Today.AddMonths(-1) },
new RobotProduction { RobotDogId = 3, RobotFactoryId = 3400, ProductionDate = DateTime.Today }
};
robotProductions.ForEach(x => robotContext.RobotProductions.Add(x));
robotContext.SaveChanges();
}
}
Now you need to tell Entity Framework to use the just created initializer.
Add the contexts part to your Web.config:
<defaultConnectionFactory type="System.Data.Entity.Infrastructure.SqlConnectionFactory, EntityFramework" />
<providers>
<provider invariantName="System.Data.SqlClient" type="System.Data.Entity.SqlServer.SqlProviderServices, EntityFramework.SqlServer" />
</providers>
<contexts>
<context type="EFCodeFirst.Models.RobotContext, EFCodeFirst">
<databaseInitializer type="EFCodeFirst.Models.RobotInitializer, EFCodeFirst" />
</context>
</contexts>
</entityFramework>
context type: The context class name (preceded by the namespace) and the assembly name
databaseInitializer type: The initializer class name (preceded by the namespace) and the assembly name
8. Use LocalDB
In this tutorial we are going to use LocalDB, a lightweight yet powerful version of SQL Express, ideal for development.
It’s really simple.
Add the connectionString in the Web.config file:
<add name="RobotContext" connectionString="data source=(LocalDb)\v11.0;initial catalog=RobotStorage;integrated security=True;MultipleActiveResultSets=True;App=EntityFramework" providerName="System.Data.SqlClient" />
</connectionStrings>
9. Explore the application
Hit F5 and go to ‘/RobotDogs’.
You will see the Index View, with the list of your previous created robot dogs!
You can edit/delete them or create a new one.
10. Conclusion
This is the end of this tutorial, you are on the good path for managing your robot dog industry.
You have created and learnt a lot of things in this example, making good use of the Entity Framework Code First approach for the creation of your database.
Leave a feedback and subscribe to remain updated for more tutorials on ASP.NET MVC.